Gated Popup :: CF Pro Tools Add-On Features for ClickFunnels
Description and Best Use Case For This Add-On:
Gated Popup is a great security protocol where you can lock the contents of your page until someone inputs a password (set by you) in a popup overlay.
Once the overlay and the password are filled out, the popup disappears and the information is revealed. Lots of great ways to use this add-on, I'm sure you'll love the add-on and find many uses for it.
NOTE: This add-on cannot be used as an opt-in.
OVERVIEW (For Advanced Users)
For those of you ready to jump in and are familiar with CFProTools, you can use this checklist:Add Your Domain To CFProTools DOMAINS TAB
Create Any Type Page
Setup the page POPUP, Add a Custom Input Field
Name Custom Input Field appropriately
Give Input Field A CSS TITLE: cf-secret-input
Input field should be NOT Required
In ADVANCED SETTINGS for the Popup, Set to FADE IN at 0 Mins, 0 Secs
DO NOT Set To Pop On Exit
Create and Configure GATED POPUP Add-on Script
Install Script to Footer Tracking Code Settings
No Known Conflicts
Step 1: Add Your Domain To CFProTools DOMAINS TAB
Your first step will be to add your domain to the CFPT Domains Tab.
Here's a guide on how to do that:
https://cfprotools.freshdesk.com/support/solutions/articles/29000041078-how-to-add-a-domain-to-cf-pro-tools-online-installation-guides
Step 2: Create Any TYPE Page
Here's a quick tutorial on how to create funnel pages using ClickFunnels:
https://help.clickfunnels.com/hc/en-us/articles/360060380833-Creating-A-New-Funnel-Step
Step 3: On-Page Configuration
On any type page you can set up a POPUP to come up over the top of your content.
So take the time to create your content, then we will build a popup element using the native ClickFunnels POPUP.

It might look something like the above image. Make sure to include a single custom input field and set the type to CUSTOM.

Next, setup your input field SETTINGS accordingly:

Ensure you set the CUSTOM TYPE field and add a name. This field should not contain any spaces or special characters outside of an underscore.
Make sure your field is set to NOT REQUIRED.

Once you have completed this area, it is time to set a CSS TITLE to the input field.
Click the "#" in the settings bar icon at the bottom of the page:

When prompted, set the CSS TITLE to: cf-secret-input

Couple more quick settings, and we're almost done!
Back in your POPUP SETTINGS, make sure to set the popup to NOT Popup on Exit.

One last thing before we move into the CF Pro Tools Configuration side...
Go to your ADVANCED SETTINGS tab for your POPUP.
Click on ANIMATION, and set the FADE IN to 0 Mins, 0 Secs.

That's it! Don't forget to save your page....
Step 4: Create Your Add-on Script
For most add-on installations of the GATED POPUP script, you can simply click the CREATE NEW button:

Please note:  You could use this script over and over for other order pages without having to create a new and unique script.  But your password would be the same for each page you set this on.

If you are going to have multiple pages with different codes, I recommend using different and unique scripts for each page.
... now do a keyword search for GATED POPUP

Once you have located the GATED POPUP script, click the thumbnail image and create the add-on per the installation instructions.
You will need to name your script.   We recommend a naming convention like this:

GATED (Test Funnel) or
GATED POPUP (Book Funnel)

It's best to name it with the name of the add-on AND in parentheses, make sure to name which funnel it belongs to so you can easily identify later.
Please configure the additional steps per the following directions:

Once you have completed this area, click the red button below to create your add-on script.

Step 6: Install Your Add-on Script
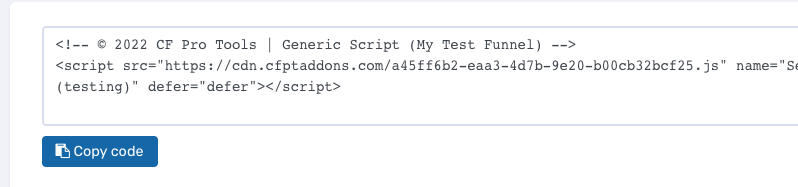
You can now copy your newly generated script out by clicking the blue button where your script is located.
The button says, "COPY CODE", this will copy the script to your virtual clipboard.

You are now ready to paste the script into your FOOTER TRACKING CODE AREA.
Click SETTINGS --> TRACKING CODE

Now click the FOOTER CODE TAB, and paste your code in:

Now SAVE your page, you are ready to preview and test your new add-on!
Known Conflicts:
No Known Conflicts at this time.
What To Do Next:
Here Are A Few Other Help Docs You May Wish To Check Out:
How To Add You Domain To CFProTools
How To Create A Free Product
Add-ons Needed To Create The Traffic Secrets Page
Chances are you already have a CF Pro Tools account and you can find all available resources, there: app.cfprotools.com
However, if you have do not yet have a CF Pro Tools account, you will need one in order to take the actions in this help doc. You can sign up at any time here: www.cfprotools.com
If you have questions, you can also hit us up in support at support@cfprotools.com
Step 6: Install Your Add-on Script
You can now copy your newly generated script out by clicking the blue button where your script is located.
The button says, "COPY CODE", this will copy the script to your virtual clipboard.
You are now ready to paste the script into your FOOTER TRACKING CODE AREA.
Click SETTINGS --> TRACKING CODE

Now click the FOOTER CODE TAB, and paste your code in:

Now SAVE your page, you are ready to preview and test your new add-on!
What To Do Next:
Here Are A Few Other Help Docs You May Wish To Check Out:
How To Add You Domain To CFProTools
How To Create A Free Product
Add-ons Needed To Create The Traffic Secrets Page